

0818 27 0151
Customer service
Customer service
Our customer support is available every working day between 8am and 4pm.
Label software guide

 Microsoft Word
- Within Word, go to the Mailings tab in the top banner

- Click on the Labels icon (top left)

- Enter the text you want to print on the labels.
Tip: If you want to print only one label, select Single label in the Print box and specify in which row and column the label you want to print is located on the sheet
- Click on Options
In the popped up Label Options box, select the type of label sheet you are printing on. E.g. if you have a sheet with 24 labels, select the one of the 24 Per Page options that matches the label dimensions of the sheet you are printing on
- Click OK
- To print the label(s) click Print. If you want to do any formatting or editing of some individual labels, click New Document
 Apache OpenOffice
- Click File > New > Labels
- On the Options tab, ensure that the Synchronise contents checkbox is selected
- On the Labels tab, select the Database and Table. Select the Brand of labels to be used, and then select the Type of label. You can find Viking vs Avery compatibility table in the bottom of this guide
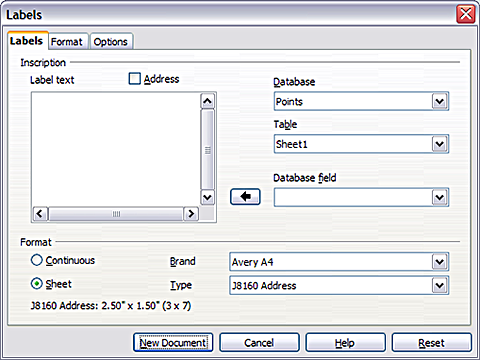
- Click on the Labels icon (top left)
- Click the dropdown arrow under Database field. Select the first field to be used in the label (in this example, Title). Click the left arrow button to move this field to the Label text area
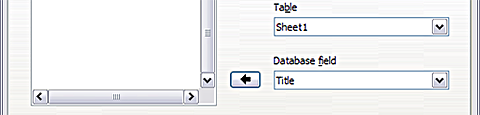
- Continue adding fields and inserting desired punctuation, spaces, and line breaks until the label is composed. The figure below shows the completed label

- Click New Document. You now have a new, single page document containing a series of frames, one for each label of the selected type and filled with the data source address fields that you selected
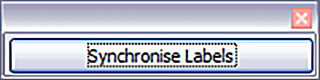
- Remembering that we selected Synchronise contents earlier, you should now be able to see a small window containing a button labelled Synchronise Labels.
Click on this button and the hidden paragraph fields are propagated to all the labels in your document
You now have a template suitable for future use with the same data source and type of label. If you wish to save it, use either File > Templates > Save as, or save it as an Open Document Text Template (.ott) into the private template directory (folder) that you have previously defined in Tools > Options > OpenOffice.org > Paths > Templates.
The labels are now ready to be printed:
- Click File > Print. In the message box that appears, click Yes.
- In the Mail Merge dialog, you can choose to print all records or selected records. To select records to be printed, use Ctrl+click to select individual records. To select a block of records, select the first record in the block, scroll to the last record in the block, and Shift+click on the last record.
- Click OK to send the labels directly to the printer.
 MacOS
MacOS
- Go to Mailings > Labels
- Select Options
- Choose Printer type, Label products, and Product number. If you don’t see your product number, select New Label and configure a custom label
- Select OK
- Type an address or other information in the Delivery Address box. To use an address from your contacts list select Insert Address
- To change the formatting, select the text and then select Font to make changes
- Select Full page of the same label
- Select OK
- Select Print or New Document to edit, save and print later
Do you use another type of software to create and print labels? Refer to respective steps in Support/Help function of your software.
 Avery online template
- Go to www.avery.com and scroll down to the bottom right of the page to choose your country / language
Or
UK/IE: https://www.avery.co.uk/software/free-avery-templates
DE/AT/CH: https://www.avery-zweckform.com/software
NL/BE: https://www.avery.nl/software/avery-design-print
- Find the Avery code for your own brand label in the table below
- Design and print or save your label

| Viking® product Code | Item code Avery equivalent |
| 980429 | L7159 |
| 980430 | L7160 |
| 980431 | L7161 |
| 980433 | L7162 |
| 980434 | L7163 |
| 980435 | L7165 |
| 980436 | L7166 |
| 980437 | L7169 |
| 980438 | L7168 |
| 980455 | 3479 |
| 980459 | 3666 |
| 980460 | 3475 |
| 980461 | 3474 |
| 980462 | 70x42-R or 3652 |
| 980463 | 3659 |
| 980464 | 3484 |
| 980466 | 3653 |
| 980467 | 3424 |
| 980468 | 3425 |
| 980469 | 3427 |
| 980470 | 3483 |
| 980471 | 3655 |
| 980472 | 3478 |
| 980474 | 3669 |
| 980475 | L7159 |
| 1137990 | 3477 |
| 1137992 | 3481 |
| 1137993 | 3483 |
| 1137995 | 3478 |
| 1671743 | 363475 |